Engine Trial Fit

IMG_0443-300x224

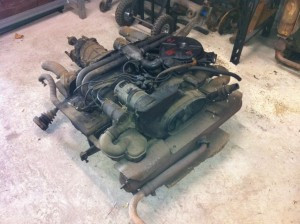
With the 50th anniversary event slowly creeping up, I’ve got a renewed enthusiasm for the Ghia and I’m managing to get quite a bit done. This weekend I set myself the task of getting the engine in the car as a trial fit so that I could look to fabricate some engine mounting brackets up. To make the job easier I decided to strip all unnecessary weight off of the engine both to make fitting it easier, and also to improve access around the engine bay. Removing the tin will also allow me to clean, prep and paint it in readiness for the new engine build.

  2714 Hits

Paint Your Wagon

66123e5258fb59b91064f167

Not updated the blog for a week or so, but that doesn't mean that I've been idle, just too busy to be able to get my thoughts translated into the electronic ether.

Last weekend I spent some time getting the doors prepped ready for painting. The front doors both needed painting, both having been partially prepped. The passenger door was already mostly done with only a few minor blemishes requiring attention but the drivers door needed a fair amount of work. The drivers door has at some time been badly dented and could ideally do with a new door skin, but in a bid to get the bus on the road I decided to see if I could make it a little straighter then it was.

  4147 Hits

Sebring Exhaust Part 1

IMG_20210212_175029

A Sebring style exhaust is something that I have been planning for a long while. Whilst it's not the best style of header to use from a performance perspective, it does have that iconic Porsche racing style to it and so is the perfect choice for a period looking car.

  2157 Hits

Sebring Exhaust Part 2

Sebring Exhaust

If you read my previous post Sebring Exhaust Part 1 you would know that I have decided to build my own Sebring style exhaust. 

This evening I managed to get a little time to make a start on it.

  2061 Hits

Sebring Exhaust Part 3

Sebring Exhaust

Managed to scrounge a few minutes to finish off the collector for the Sebring exhaust tonight. I had ran out of gas when I was initially welding up the collector and so still had to join the two halves together. Today I managed to get a few minutes to finish them. I spent a little time tidying up the insides so that the two halves were symmetrical and then welded the two halves together to finish off the collector. I also trimmed down the uneven ends so that everything is ready for the next stage.


  1775 Hits

Silencer End Pressings

IMG_20210313_181404

After completing the collector for my DIY Sebring exhaust the next part that I need to tackle is making the silencers. I have already spent a bit of time doing some research to try and find some off-the-shelf items but due to the small size needed I could not find anything available that could be used without having to modify it. This means that the only option left is to make them myself.

  1607 Hits

It's inside

IMG_20211224_132759

Been a while since anything has happened on the speedster. Not that there is anything to really report, but I did manage to tick off a couple of small jobs recently

  875 Hits

1 week in - being a dad!

/photos/Laughlan.jpgWell it's been a very interesting past week or so in our household. Our first child was born, which turned out to be a boy Laughing, we had decided not to find out the sex as we wanted it to be a surprise. We thought that as there were few surprises left in life that weren't unpleasant, we would not find out the sex before the birth. Nine months of anticipation was ended when we were handed the little fella - a very emotional moment - especially to find out it was a boyLaughing. It was also my birthday a few days prior - definitely the best birthday present I've ever had.

  902 Hits